Friday, November 1, 2013

My first Maternity Photo shoot in Goa, India

Hello everyone!

How are you all doing?
I have been pretty busy these couple of days, so couldn't blog, my apologies.

I have been experimenting lately with different types of photography and I have been very blessed to shoot a very young and bubbly couple who are expecting their first child.

I just told them about my new venture on Sunday right after the morning church service and told her my idea of dress and location, and this couple were more than happy and obliged to participate.

I was pretty anxious as to how the shoot would progress as this is my first time, I really prayed hard for everything, and I decided to experiment with all the shots I had noted in my Idea book which I keep updating everyday.

I wanted the shoot during the dawn so that I could have those beautiful sunlit pictures of the gorgeous mom-to be, but the day was very over cast and I doubted if I will be able to use just the natural light to brig in the magic.

In-spite of certain difficulties, I got my kiddo ready, and left for my client's place at 4.00, and was pretty happy to see her wearing a dress as I had envisioned, and my floral headbands which I fixed very urgently were a hit too, she looked dashing in my blue headband which was in contrast to the pink shades of their dresses.

We thought of a location earlier but due to lack of much light decided to check out a location very close to the client's house, and that was what I exactly wanted and praised God as soon as I saw the place. I had also prayed for pink flowers, cause that was the theme but couldn't find something fitting my imagination. but as soon as I reach the location I see the dry grass lined with wild asteraceae pink flowers everywhere, I grab a few, n viola and my DIY prop is ready. I was very happy and praised God again.

The lady just entered her 8th month, and was very radiant, she does not have any fat at all and I pretty surprised by her posing abilities, on the contrary I was scared and extra careful, but the girl was very enthusiastic and climbed the lil' hillocks with ease. 

She, is a natural poser, and her husband too, they made my work pretty easy, and dressed perfectly too.  
Hope you like my work.


Do visit my FB page for other pictures in the series.


Friday, October 25, 2013

INFANT PHOTOGRAPHY


Hello!
A very good morning to all of you.

How was your day yesterday? Mine went smoothly...spent a lot of time playing with my naughty little 6th month old munchkin, my little one is growing pretty fast and I'm loving it!!!!

I always love clicking kids, and i especially love to capture the candid random stuff they do..I never kinda like the posed and poised kids pictures, I always believe in clicking them randomly in their own world. 

The best tip to photograph kids is...BECOME A KID AND MINGLE WITH THEM.

Kids do not usually get very friendly wit the strangers around them , but when you tell them stories, talk to them ,interact with them, do the silly stuff they do..they instantly connect with you and that's when you start clicking them.

My interest in Infant or rather children photography spiked when my little baby boy was born.

I kept clicking many pictures of him, I was away at my mothers place during pregnancy and delivery and I made sure to click enough pictures of every new thing my kid did so that my husband wouldn't miss any of the cute little actions he did in his absence.

But these days I got so busy and caught up with stuff that I don't really click many pictures...but then I realized that he is increasingly getting active these days so, I need to document every mile stone of his. And I started to click him innovatively and will keep clicking more.

Here is a sneek-peak into ADVENTURES OF SHAUN MANASSEH KOLA...:)


GOA..A paradise for bird lovers

Hello!
A very good morning to all the birders out there.

How are you all today?
What interesting things have you planned for today?

As usual as soon as I got up. I went to my window to let in the cool breeze, and I suddenly see the world outside beaming with activity, I rush in to grab my camera and started clicking. And then suddenly it stuck to me that I should tell you all about the various birds I  get to see here from the very comfort of my home. 

You cant believe me isn't it?

Yeah it was hard for me to believe that I can watch all the wonderful creatures created by the creator staying at home, and I can't praise Him enough for His wonderful and varied creation.

So, coming to the point I wanted to throw a light upon the varied fauna of the STATE OF GOA.

Goa boasts of about 425 different species of birds, this large number for such a small state is the rich vegetation and green belt found in and around Goa, and the fact that Goa is surrounded by the western ghats makes it much more interesting place to watch out for many endemic species.

Today I'm gonna list out the various birds I managed to capture from my window.
1. Ashy Drongo (Dicrurus leucophaeus)
2. Black Drongo (Dicrurus macrocercus)
3. Common Tailor bird (Orthotomus sutorius)
4. Greater Coucal (Centropus sinensis)
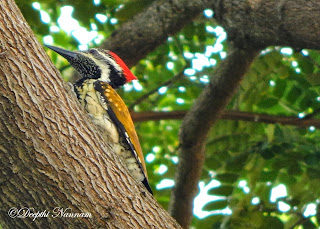
5. Greater flame backed wood pecker (Chrysocolaptes guttacristatus)
6. Indian Golden Oriole (Oriolus kundoo)
7. Indian Koel (Eudinymus scolopacious)
8. Jungle Myna (Acridotheres fuscus)
9. Oriental Magpie Robin (Copsychus saularis)
10. Purple rumped sun bird (Leptocoma zeylonica)
11. Red whiskered bul-bul (Pycnonotus jacosus)
12. Red vented bul bul (Pycnonotus cafer)
13. Rock pigeon (Columba livia)
14. Vigor's sunbird (Aethopyga vigorsii)
15. White cheeked Barbet (Megalaima viridis)
16. White throated king fisher (Halcyon smyrnensis)
17. Yellow footed green Pigeon (Treron phoenicoptera).

I have already posted about a few birds and will very soon start posting about the birds mentioned in this post along with the other birds my husband and me captured in our birding trips.

My husband admitted that though he has been in Goa since two decades he barely noticed anything other than the crows, pigeons and sparrows. But now he is so interested in photographing birds that he never misses any chance to shoot (pun intended) any bird in his sight no matter what. lol

So, dear birders!
Why the delay, pack your bags and come visit this beautiful state, and now that the rains have stopped and it is all sunny and dry, you can also hit the beautiful beaches, have fun, and frolic around. Why delay any more? Check out this link of Goa tourism and book your birding packages today.

Happy Birding people...:)

Cheers,
Deepthi Nannam

Thursday, October 24, 2013

Macro Photography tips for Point and Shoot Cameras V

Hey People!
How are you today?
It rained very heavy last night and sent a cool breeze all over but the morning sun made all the signs of last night's rain disappear...just saw a white throated kingfisher and a crow in an aerial fight, ran to grab my camera but it was too late by then. OK, then lets put the personal talk aside and concentrate on the last and final topic of Macro photography.

To understand this discussion today you need to check my last posts too.

Today we are going to discuss the last but not the least topic of our Macro photography discussion.

5.POST PROCESSING

This may seem useless to few but trust me the editing which we do after a shot is equally important as the shot itself, but there are a few pictures which have been so perfectly framed that they do not need any editing at all. Trust me there are not many such pictures.

Now that I'm talking about editing and all do not be  afraid that I'm emphasizing on very difficult editing tools, but rather I'd like to introduce you all to the very basic editing tool by GOOGLE which is freely available and not much explored by everyone. 

Ah! yes, you all guessed it right...I'm talking about the PICASA software. Take my word people this the best laymen photo editing tool available, it does not require technical expertise to do the editing. All the techniques are very clearly written and the thumbnails show the post processing effect and you can undo any thing you have done, is it not very easy people?

You can download the Picasa software here.

Now the most basic adjustment we can do to make the picture lively is to adjust the color, contrsat, brightness etc 

I would like to illustrate what Picasa does to a picture when used subtly


The two pictures above are the same(Very tiny seed dispersal of wild Asteraceae flowers) but the later has been processed appropriately in picasa.

The tools I used here are Tuning and Cropping.

Tuning: I have increased the contrast and the shadow in the picture. Which eliminated the dullness and brought the rich color of the plant and its background but got a bit overexposed due to the usage of flash.

Cropping: The picture has been appropriately cropped to show in the detail of seed dispersal as well as to get the required closeness.
When cropped the picture becomes quite big and the unwanted things in the picture can be eliminated to showcase what we intended to.
While capturing this picture it was windy and I had to use flash which restricted me from going very close to the plant as that would cast a shadow which is very undesirable , hence took the picture from a distance and rather thought of cropping it later to show the parts only in perfect focus.

There are many other modes in picasa which you can explore and this software also allows us to upload and store our picture online with our gmail account or separate picasa account, isn't it a wonderful thing? So, why the delay my dear friends start clicking and have fun editing to give those dramatic effects to your pictures which you have been dreaming of all these days.

Good luck with photographing the best Macro shots ever people.

Keep smiling and Happy clicking

Cheers,
Deepthi Nannam

Wednesday, October 23, 2013

Macro Photography tips for Point and Shoot cameras IV

Hi! 
Hope you are all good today, and did you enjoy my yesterdays post?

Let us continue the tutorial in macro photography, we have discussed 3 points so far, now the next point of importance is STURDINESS OF HANDS OR TRIPODS.

Using tripod is a very important step to achieve those wonderful macros, tripods allow us to achieve the details of the subject very well because the lens is stable and the chance of moving is eliminated, which results in blur free images. The usage of tripod becomes inevitable especially while shooting insects outdoors. The insects are either very fast moving like dragon flies, bees etc or the branch or flower on which the insect is sitting or feeding might be swaying in the breeze, remember not only high velocity wind effects the picture quality but even a little breeze can do much harm, and the lens when set in macro mode is vulnerable to even these slightest changes in the air, so If you want a better macro photograph, consider getting a tripod very soon just like me or you will end up getting such blurry images .


I will very soon get a tripod and will post it's details very soon.Very good tripods are available even for a lesser price. Check out this link from Flipkart for a variety of tripods in an affordable range. 
Word of caution: Please read the customer reviews and various video links attached on the site before purchase.

Okay, people don't be disheartened if you cannot think of getting a tripod now, I will post a few pictures which I took without tripod and will surely hope that even hand held shots can be wonderful. The trick is to have very sturdy hands.
The following two picture were hand held


Or another cheap idea is to rest our camera on something solid if available. 
Eg. I would like to display two images here which have been shot in an interval of a minute, the Exif,is the same but a slight variation in the angle which they were shot.


You can click on the images for a closer view.

The two images displayed here are of Euphorbia milli flowers from my home garden(not much of a garden though) both of them look equally good, they were clicked using all the earlier mentioned points in the previous posts like a shallow-depth-of- field, an appropriate angle to showcase the pollen inside the flowers, and the white balance is set properly as to not burn the colors of the image.

But the only difference is that the first image was shot by resting the camera on the window grill while the second shot was hand held.

Now when they were zoomed to 100% and cropped appropriately it resulted in the following images, 


Now do you see the difference in the clarity of the pollen?
The first image has a relatively clearer pollen than the second image.

That is the reason the camera has to rest on some support, but that is not possible every time, is it? Hence the importance of tripod cannot be ruled out in Macro photography.

Hope my article helps, do write in if you have any doubts and I would be honored to reply. And keep checking for my further tutorials.

PS: Please click on the images for a bigger view.

Have a great day people, keep smiling and Keep clicking.

Cheers, Deepthi Nannam

Tuesday, October 22, 2013

Macro Photography tips for Point and Shoot cameras III

Hello everyone!
How are you all doing?

Hope you have enjoyed my last post on Lighting tips in macro photography for Point and shoot cameras, If you haven't read it yet then please do visit  because the present post is a continuation of the last post.

Don't you ever look at the wonderful macro pictures on the internet and wonder if you could also click something like those. But very often we get discouraged because we do not have the right gear for that, and admit it that we do envy the fact that those people have those hi-fi cameras and fancy lenses. But do not be dis heartened dear friends because I'm a person just like you, having only a "POINT AND SHOOT" camera. But that doesn't stop me from experimenting time and time again until I get the desired results. 

The macro mode built in the point and shoot cameras also give some amazing photos provided you are ready to keep trying no matter what and God willing some day you might own a brand new DSLR and those fancy lenses like others, but till then keep pushing your Point and shoot to its limits like I do and trust me, your camera will become your best friend and your pictures will start speaking your thoughts.

For the picture to convey your words an important thing to remember is THE ANGLE OF PHOTOGRAPHY.

Trying to capture a something in almost the same way becomes monotonous after some day and people loose interest in your pictures, so this article will emphasize on the Angle involved in photographing using Macro mode.

Let me explain my point to you through an example


Above are the three shots of the same flower(These are the tender buds of the Euphorbia milli).

1.
In the first picture we observe that the angle is very common this is the common mistake people do while clicking the macros of a flower, they go quite close and they try to focus from an angle above the flower. 
The cons of doing so are that the image is out of focus because the subject is too close to the lens and the details are lost making it a bad picture.

2. 
The second picture is taken by tilting the camera at an angle which is slightly away from the perpendicular shot above. 
Pros: The details of the flower are retained
Cons: The composition is not very interesting
Nevertheless some people might like the picture, depending upon their personal taste.

3.
The final picture shows the buds in a bokeh backdrop, +which has been achieved using a shallow depth of field and the rule of thirds (This will be explained in the coming posts, so stay tuned )have been used to compost the third picture which makes it an interesting composition. 
Pros: The availability of a far away background with trees have been used here to make the subject stand out, and it gives a professional touch.

Stay tuned for the next posts on tips for macro photography.

BOKEH, RULE-OF-THIRDS, DEPTH-OF-FIELD etc will be explained in my coming posts.

PS: Please click on the images for a larger view.

Till then have fun, keep smiling and Happy clicking people.

Cheers,
Deepthi Nannam

Sunday, October 20, 2013

Macro Photography tips for Point and Shoot Cameras II

This post is a continuation of the last post.

So, we were discussing the various possible subjects in macro photography. Today I will give a few more examples and then will move ahead with lighting.

The other subjects can be Insects which make for interesting subjects only when the focus is at the right point.


Wasp clicked by my husband using Nikon L820
Look at the clarity, even the fur on the wasp is clearly visible
For more of the interesting Insect pictures please visit the following link INSECTA

2. LIGHTING

Lighting plays a very important role in macro photography, in any photography as a matter of fact though.
The best light would be the sunlight, especially early in the mornings and in the evenings when the glow of the sun is soft and is at an angle and sun casts a beautiful glow on the subjects.

Please avoid shooting when the sun is at its peak and the skies are clear because the intensity of the sunlight is very harsh at noon which makes the highlights of the picture to be "blown out". And the natural hues or color of the subject changes.

So, while shooting outdoors white balance should be taken into consideration to capture the real colors and to retain the freshness of the subject. Choose the sunlight option under white balance for shooting outdoors.
Shooting in very harsh light and without setting the white balance resulted in "blown up" image and false colors 

The same flower shot at a different time of the day when it was cloudy and with white balance set to Sunlight
The above two photos were shot using a 5mp Samsung duos phone camera.

But when the subject is being shot indoors, then the flash plays an important role, make sure that the camera is not very close to the subject as the flash can cause a shadow. Select the Fill flash option which is more desirable while using flash.

Flash plays an important role even outside when the subject is constantly moving due to wind, the usage of flash enables us to freeze the motion in other words it eliminates blur.

The following examples illustrate this.
Buds of the wild neem (Melia azarderach), the flash has cast a shadow

By properly distancing the subject the fill flash option can be used to create stunning images

Though these flowers were captured during day light the shadow of the tree, and it was quite windy which made me use the flash. 

This ends the topic of lighting, the post will continue with the remaining topics.

Saturday, October 19, 2013

Red whiskered Bul-bul (Pycnonotus jocosus)

Hello people!
How are you all?
Today I'm going to post about the most commonly found bird in our locality after the house crows and the Rock pigeons.

These birds perch in the shrubbery below our apartment and are frequent visitors to us. they have the characteristic call which is very pleasant to the ear I love waking up to their calls in the morning, their call is translated as Kick-pettigrew and it is also translated as Pleased to meet you. Isn't it intersting folks?

These birds as the name suggests belongs to the bul-bul family, they are small passerine birds, and are predominantly furgivorous which means they primarily feed on fruits. But they do eat insects also.

TIP FOR IDENTIFICATION:
1. The thick tuft of fine red feathers near the mouth refereed to as whiskers. (Picture 1)
2. The elevated or heightened crest.(Picture 2)
3. The red vent.(Picture 3)

These birds have their characteristic red whiskers on their cheek it is rather a tuft of soft feathers.

The characteristic tuft of red feathers.
This image was captured by my husband.

The distinctive crest on it's head is used as an easy identification mark.

Like its cousin The Red vented bul-bul even this has a red vent
 very soon I will post about the red-vented Bul-bul
An interesting point of note for biology geeks like me out there, This species of bul bul was first described by Sir Carl Linnaeus in his Systema nature.

For people who heard about them for the first time can check out the attached wiki links.

PS: Please click on the images for a larger view.

Keep smiling and keep Clicking.

Cheers,
Deepthi Nannam

Thursday, October 17, 2013

Indian Golden Oriole (Oriolus kundoo)

These yellow beauties are a feast to the eyes.

What do you think?

Female Indian Golden  Oriole

Another profile

This bird was perched very far so could not capture the stunning details of it, but happy enough to have captured it as soon as I saw it for the very first time.

Greater Flameback (Chrysocolaptes guttacristatus )

Hello!
These days I'm so engrossed in Bird photography, that when ever I get some free time i.e. when my 6 month old son sleeps or when my husband has a holiday or during weekends I go out hunting to shoot new birds and to keep them caged in my computer :)

I now present to you all a new debutante in my collection of bird photographs. THE GREATER FLAME BACKED WOODPECKER( Chrysocolaptes guttacristatus)

I saw this bird perched high on a rain tree outside my window a very long time ago and tried capturing it but couldnt capture it clearly due to the thick foilage of the rain tree and very recently the neighboring apartment people had half of the tree overlooking my window chopped down which brought tears in my eyes and the thought of not having any more birds come made me very sad, but neverthless I never lost heart as that is a way in which I tend to spend my little free time, and have been eagerly waiting for it to show up again and I'm pleased to tell you all that it was back and though it was very high like the last time the lack of obstructing branches made my job easy. Though the bird seemed to be in a hurry, I managed to grab some beautiful shots of the magnificent creature.
Hope you like them.

TIPS FOR IDENTIFICATION:
1. Un marked golden yellow to dark brown back and wings
2. The red hood is characteristic of males

Adult male greater flame backed woodpecker

characteristic red crown of an adult male

Tuesday, October 15, 2013

Common Tailor Bird (Orthotomus sutorius)

I always heard a very prominent Cheep-cheep-cheep everyday whenever I went into our balcony but could never notice a bird in the vicinity, but after waiting patiently and after very careful observation for many days I found a very small bird in the near by shrubbery, and was sure those loud cheeps belonged to it, but my attempts at capturing the bird failed every time I tried because of the very fast nature of the bird and it being very small to zoom in properly, Took numerous shots but all were hazy or the eye of the bird was out of focus.

But I never gave up and then finally caught it having a stroll on my neighbors balcony grills.

So, here is the naughty little bird who gave me so much trouble...:)

Common tailor bird

But for it's mate the bird would never be strolling so carelessly I guess.;)

Sunday, October 13, 2013

Oriental Magpie Robin (Copsychus saularis)

Capturing a new bird can be very encouraging to Bird photography newbies like me and if both the male and female are clicked then the joy of the photographer knows no bounds...what do you say people?

You might be wondering as to why all the drama in this post?
Well, hear is the answer..I captured both the male and female Oriental Magpie Robin, both on a different day though after numerous hours of waiting and n number of clicks I could finally get both of them framed.

Here are the beauties.

Female Oriental Magpie Robin

Male Oriental Magpie Robin
Pardon the angle of the male bird but that's the closest I could get to the male bird. But the female bird was friendly enough to let me take a good click may be just for a minute.

An important point to remember in capturing small birds like Robin or much smaller birds like Fly catchers and sparrows is to not use the digital zoom cause they can haze the clarity and any post processing will not give the desired sharp image. 

Another point of note in Bird photography is to point our focus on the eye of the bird, especially when capturing birds of a monotonous shade, otherwise the picture lacks to capture the interest of the observers.


Saturday, October 12, 2013

White spotted Fantail (Rhipidura albogularis)

This is also called Spot-breasted-Fantail, this is the only fantail found in Goa out of the 4 fantails found in India.

Captured this at Vasco-Da-Gama municipal park. This bird is always there and as soon as we enter the park it kind of welcomes you with a tail display. 

Captured this with my Nikon L820 as well.


look at the tail..hence the name

Wednesday, October 9, 2013

Henceforth ViDeez Photography is Deepthi Nannam Photography

Heya ppl...!
I have an important announcement to make.
Hence forth my blog will be called Deepthi Nannam Photography instead of the old name Videez Photography, I regret the inconvenience.. and The URL link is deepthinannamphotography.blogspot.com.

Cheers,
Deepthi Nnannam

Macro Photography tips for Point and Shoot Cameras

MACROS....oooh!
I kind of like the term and also love clicking in that mode...who doesn't?
I'm neither a professional photographer nor do I own a professional DSLR camera with a fancy Macro lens. (No offense to people with those wonderful Cameras).
Rather I'm an amateur with a great enthusiasm and passion for photography and I own a Bridge camera. But that doesn't stop me from getting some wonderfully clean and crisp macro photos, it shouldn't stop you either.

Today I'm going to illustrate neatly about the steps involved in macro photography with relevant examples.(All the photos in this post are clicked only by a point and shoot camera  by me unless and otherwise mentioned).

First of all...check out for the following flower like symbol on the camera to go to macro mode.

Click on this button, and start clicking, but some cameras like Sony cybershot, etc do not have a special button for macros but rather you have to set your camera in auto mode and get the camera closer to your subject and your camera automatically displays the symbol and you can start clicking.

And before you get close to your subject please press the shutter button slightly which allows you to focus on the subject properly and then in the next click you can start clicking, perfectly focused pictures. And when you slightly press the shutter button then you can know which part to highlight in your picture and the you can blur the other parts.

Important points to remember in Macro photography:

1. Subject
2. Lighting
3. Angle of Photography
4. Steadiness of hands or Tripod
5. Post-processing
And most importantly PATIENCE

All there are interrelated and cannot work without each other.

We come across many interesting things and little creatures in our daily lives which may seem mundane but after careful observation would make for some wonderful SUBJECT..

There is no hard rule, just let your imagination run wild and in no time you will have great pictures. The subjects may be flowers, insects, still life or any thing.

Today I'd like to discuss in detail how ordinary things seem extraordinary in Macro photography. The main focus of the article is upon the FLORA. Check out my Facebook link for other  macro flora subjects

Droplets of rain on a Euphorbia milli leaf with the refraction of the building in the back ground.

These are the flowers of a variety of wild grass which were swaying in the wind, their rich color against the blurry background makes it a good picture.

This is a wild Fabaceae flower(Need help with the ID), The monotonous green of the leaves makes the bright orange stand out

These are the sexual stage of a moss called Funaria, these are very small in size almost a cm or so and go  UN-noticed by everyone

Here the concentration  is on the pollen which being in the same color as the flower stands out cause it has been focused upon.

These are very few examples of what the subjects can be and will discuss the rest in the coming posts. Till then Keep smiling and keep Clicking.

PS: Please click on the images for a larger view.

Cheers,
Deepthi Nannam

Tuesday, October 8, 2013

White throated kingfisher (Halcyon smyrnensis)

I'm on a look out for birds these days and one day in the evening I went into my balcony to close the windows, just then I saw a brilliant display of blue fly across me and I ran to capture the beauty.


White throated kingfisher on a rain tree branch

White throated kingfisher
Please click on the images for a larger view.

An important point to remember in bird photography is to use shallow depth-of-field well so as to create an un- cluttered background which makes the subject stand out.


Bird Photography. Warning: It is quite addictive

Photographing inanimate objects is a very wonderful thing but the real challenge comes in while photographing animate subjects especially birds cause they are quite unpredictable and are very easily scared and fly away, I very clearly remember photographing a Purple rumped sunbird when I was on a vacation and I loved it so much That I got hooked to it instantly and have been on a quest since then to capture as many birds as possible. Hope I get to fulfill my desire to capture those lovely winged creatures and showcase them to people around so that we could all praise the Creator for His Awesome creation.
Check out this space for Bird Photography.
Cheers,
Deepthi Nannam

Monday, October 7, 2013

Hi!

How are you all?
Hope life has been treating you all well.
We have been blessed with a handsome baby boy.


My little munchkin Shaun Manasseh.

Tried my hand at INFANT  PHOTOGRAPHY (BODY-PART)collages and I'm quite happy with the result.
This was when he was a month old, and in a week he will be 6 months old.

That reason is obvious enough to justify my long absence I guess :). And I hope to be regular now, wish me luck folks.